Creating a Real Call Analysis (RCA) task type
Last updated: April 22, 2026
Overview
The Real Call Analysis (RCA) simulation type in Second Nature is a powerful tool for enhancing sales performance by analyzing real-world calls using a company's scorecard.
This AI-powered system evaluates actual sales calls submitted by trainees, offering data-driven insights into their performance. It allows managers to define specific evaluation criteria, and trainees can submit calls in various formats (WAV, MP3, MP4) for in-depth analysis.
NOTE:
Real call analysis requires a specialized template that is configured per company. For more information contact support@secondnature.ai .
Creating RCA Training Simulation
The creation of an RCA simulation consists of three key components:
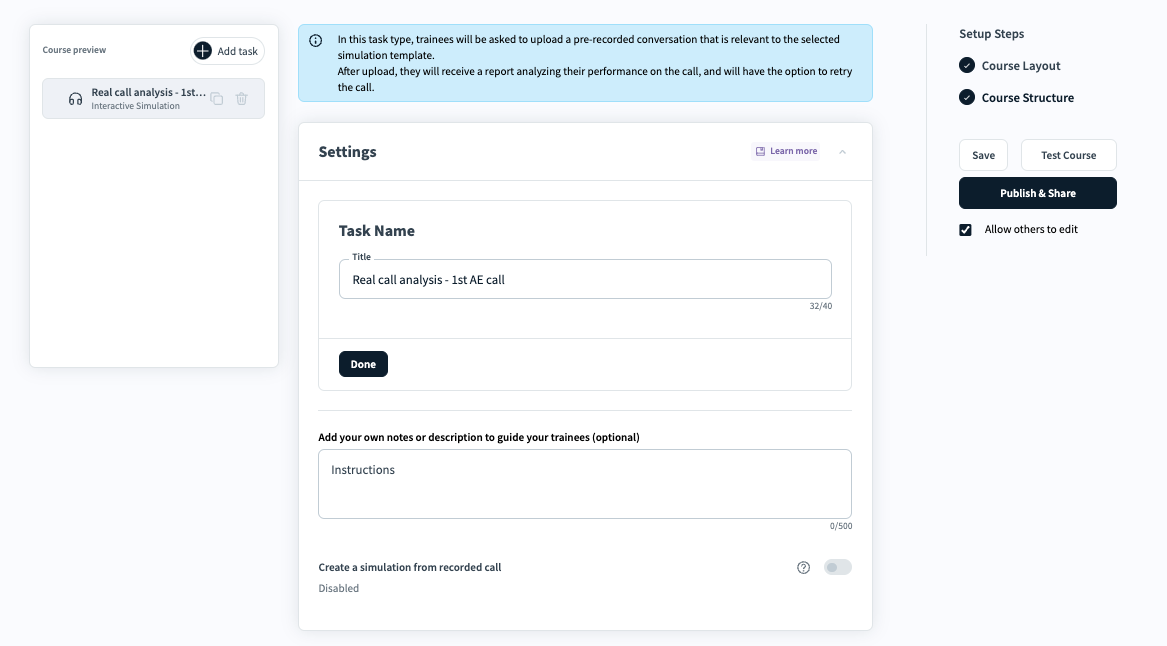
Part 1: Settings
In this component the course creator can:
Change the task name. Click Done to save the new task name. [blue rectangle]
Add instructions for the trainee to read. These instructions will appear once the trainee starts the RCA task [black rectangle] [See below the trainee view].
Toggle the Create a simulation from recorded call option
Disabled: The trainee will only get a analysis of the uploaded call [no simulation].
Enabled: The trainee will get their call analysis and will be able to practice the call again with an AI prospect. Enabling this option will enable additional components in the editor.
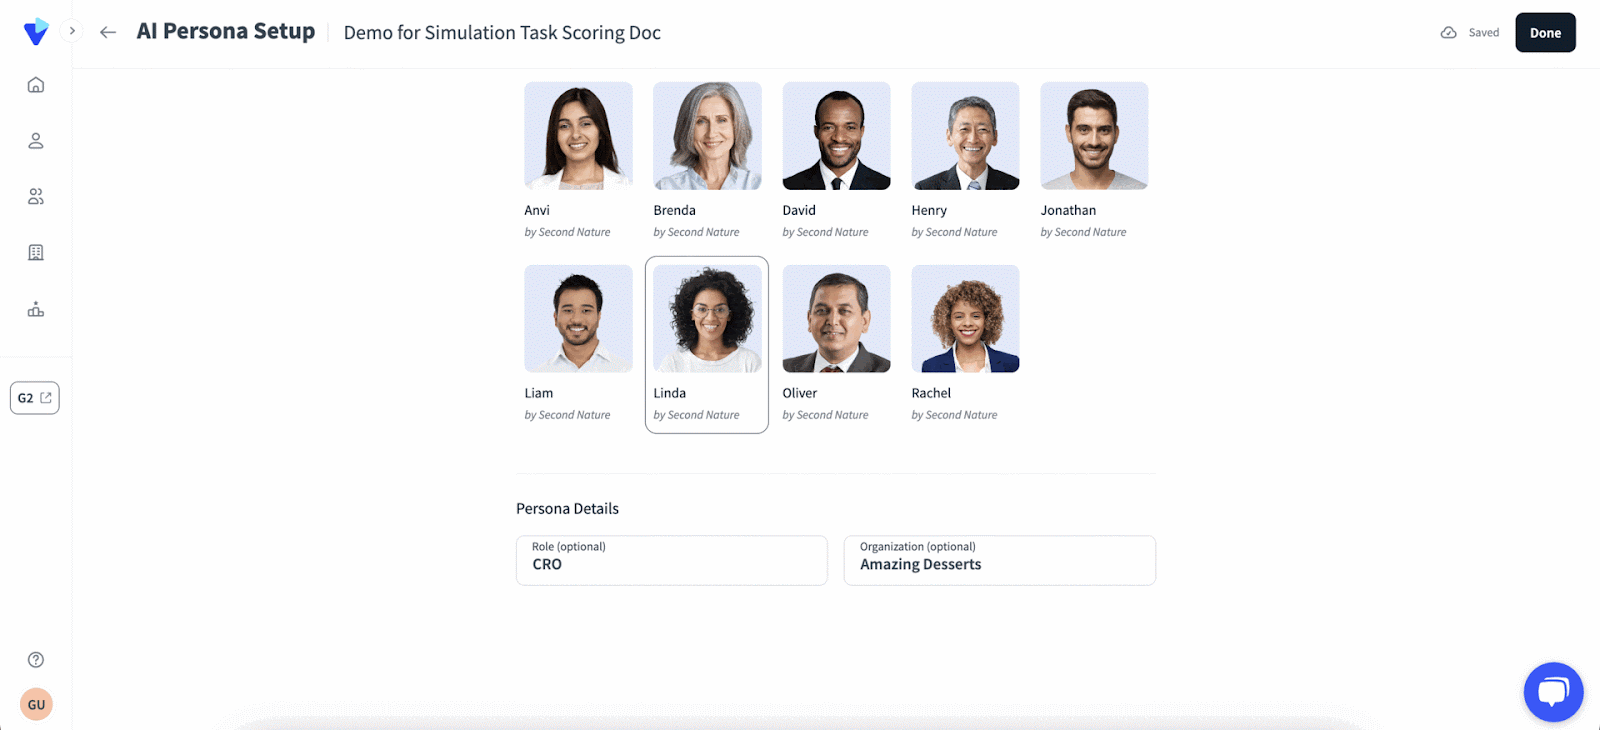
Part 2: AI Persona Setup
This section is only available if the “Create a simulation from recorded call” toggle is enabled.
Go to the AI Persona Setup section. A preview of the AI Persona will be visible with two tabs: Second Nature Personas and Custom Personas. To adjust their persona, click Edit next to the AI Persona Details field.
Press Done when you have completed setting up your AI Persona.
NOTE:
Second Nature Personas can not be modified or deleted. A course creator can only delete custom personas in the following cases:
They themselves created the persona. You cannot delete a persona that a different course creator in your company has made.
The persona is not used in a live simulation. Before trying to delete a persona, be sure to archive any simulation that uses their likeness.
a. Select an AI persona from the list and set their role and organization. The AI persona that is selected will affect the voice that the trainee hears on the call.
i. Hover over the AI persona’s card to reveal more options:
Hover by the AI persona’s name to see a play button. Press the play button to hear what the corresponding AI Persona will sound like.
Hover by the top right corner of the AI persona’s card to reveal a ⋮ (vertical ellipsis) button. Press ⋮ and then Edit or Duplicate to modify a custom AI persona.
b. Optionally, enter a role and organization to be associated with the persona. These details can help the trainee understand the context of the conversation.
/TIP: If you are getting ready for a real call, you may wish to adjust the AI persona name, role and organization to match the call./
The GIF below demonstrates creating a custom persona.
Part 3: AI Evaluation Criteria
The AI Evaluation Criteria sets the evaluation criteria that the trainee will be scored on. Click Edit to set the topics you want your trainees to discuss during the simulation. This will load the topics table.
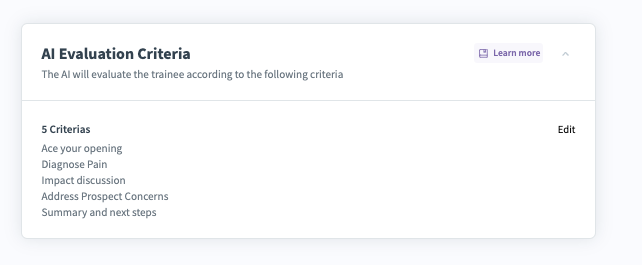
In the topics table, you can add specific topics and provide guidelines for each topic. Include any relevant evaluation criteria and resources. Press Done when you have finalized listing the topics to cover and weight of each section.

There are 2 ways to add topics to the topics table:
a. Writing a customized topic directly on the table.
b. Using a pre-defined topic from Second Nature topics list.
i. Press Add topic to create new topics for the discussion.
ii. Press Choose from list to receive a list of common topics discussed during a simulation. Press the checkbox of each of these topics you want the trainee to discuss during the simulation. Press Add topics when you have completed this.
iii. Press Custom to add a new line to your table of topics. You may add any topic. In the example provided below, a custom topic “Company motto” is entered, meaning the trainee is expected to discuss the company’s motto during the simulation.
NOTE:
Evaluation guidelines are formed automatically once a topic was entered
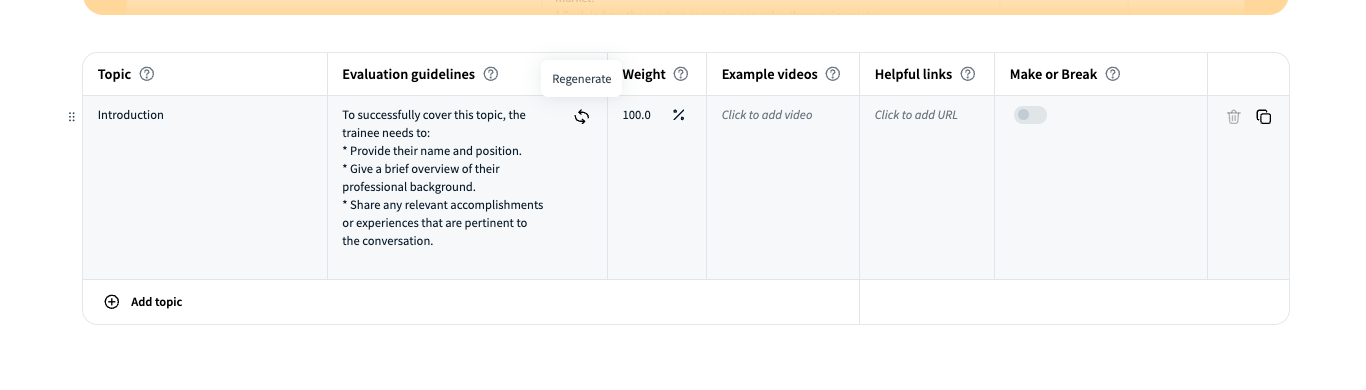
You can edit the evaluation guidelines as needed. Evaluation guidelines are a breakdown of how topics will be analyzed. They act as an outline of key information the trainee needs to cover or discuss to properly handle the topic.
Within each evaluation guideline cell, there is a Regenerate button at the top right corner. You can use this button to auto-regenerate the evaluation guidelines. You may press this button multiple times to get ideas of how a topic can be evaluated, or enter your own evaluation guideline.
For example, if a topic of “clarity” is provided, an evaluation guideline may include text like, “To successfully cover this topic, the trainee needs to: Clearly explain the product or service being offered. Use simple and easy-to-understand language. Provide examples or demonstrations to illustrate the product's benefits.” Alternatively, the topic can be broken down into specific segments, such that “clarity” is evaluated by “articulation, enunciation, tempo of speech, pausing, breath control, body language, confidence.”
NOTE:
The evaluation guidelines set the criteria the trainee needs to pass in order to get a score of 100. Trainees must cover all topics to receive a 100. In the example below, you can see that for the topic “Introduction”, the trainee needs to: 1) Provide their name & position 2) give a brief overview of their professional background 3) share accomplishments or experiences pertinent to the conversation.
NOTE:
Adjust the weight of each topic as needed. By default, each topic added will carry equal weight. However, you can prioritize one topic over another by having it carry a greater weight.
a. The sum weight of all topics must equal 100.
b. There can be a maximum of 10 topics evaluated per simulation.
NOTE:
Add relevant links for each topic as needed.
Each row may have an Example video uploaded. This is typically a recording of how the topic is addressed in a conversation. For example, an example video may include a recording of someone demonstrating the competitive advantage of a product discussed in a simulation.
Each row may have Helpful links uploaded. This can be any material pertinent for the trainee to understand the topic better. URLs must begin with “https://” to be considered valid.
NOTE:
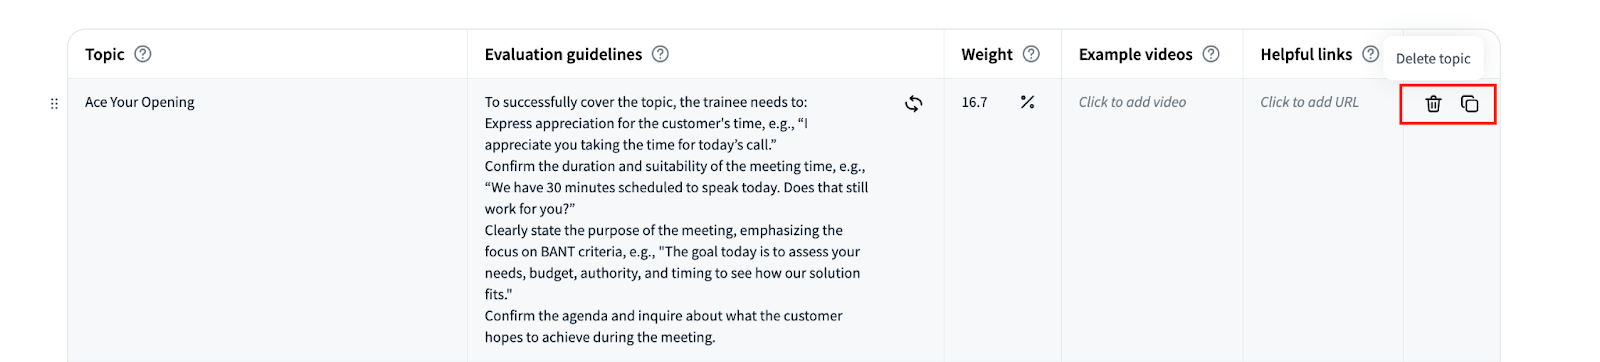
There are options to Delete topic or Duplicate topic revealed when you hover over the last (right side) column.
Part 4: Score Settings
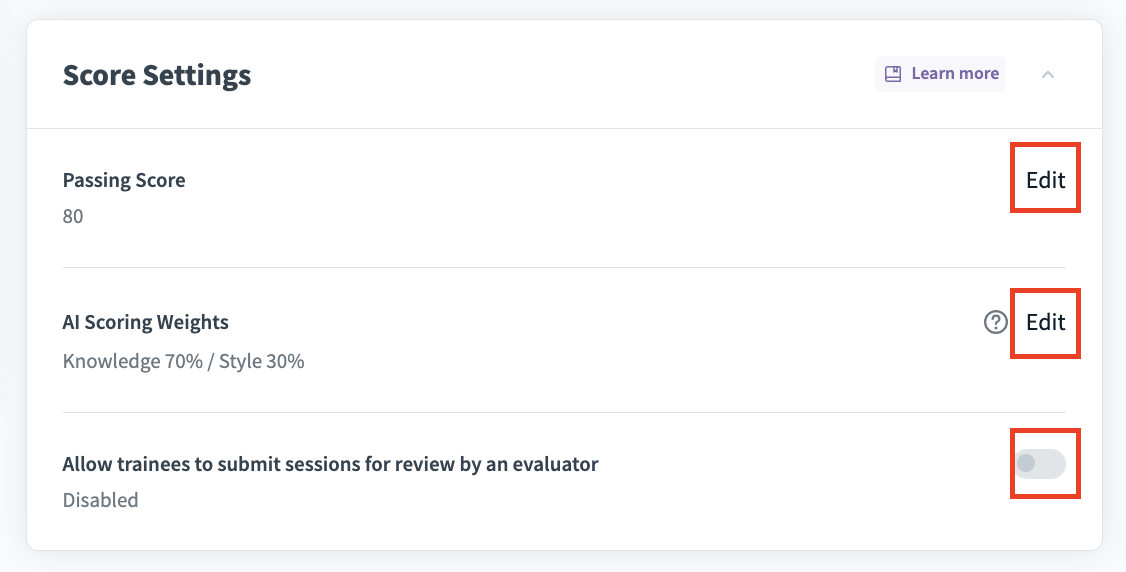
Click on the Score Settings section to expand the card and reveal scoring options. Edit the default score settings as needed.
a. Passing Score is a minimum score that a trainee must receive to successfully complete a simulation. Click Edit to set the passing score as a number between 0 and 100. Press Done when you are complete.
i. By default, simulations require a passing score of 80.
b. AI Scoring Weight is a ratio of how much emphasis should be placed on “knowledge” compared to “style.” The AI will use these weights when evaluating sessions conducted in English. You can learn more about “Knowledge” and “style” in the document “Analysis Page".
i. By default there is an AI Scoring Weight criteria of Knowledge 70% and Style 30%. This can be adjusted as needed.
c. Allow trainees to submit sessions for review by an evaluator is an option for human grading of simulations, in addition to the AI grading. By default it is disabled. You may adjust the toggle to enable this option.
NOTE:
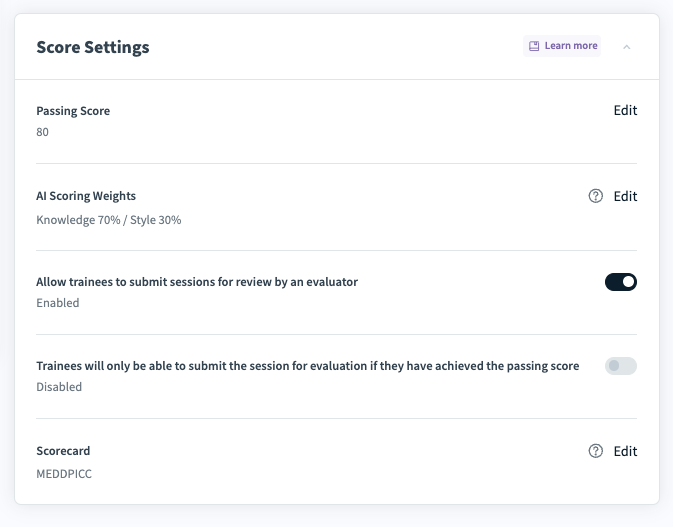
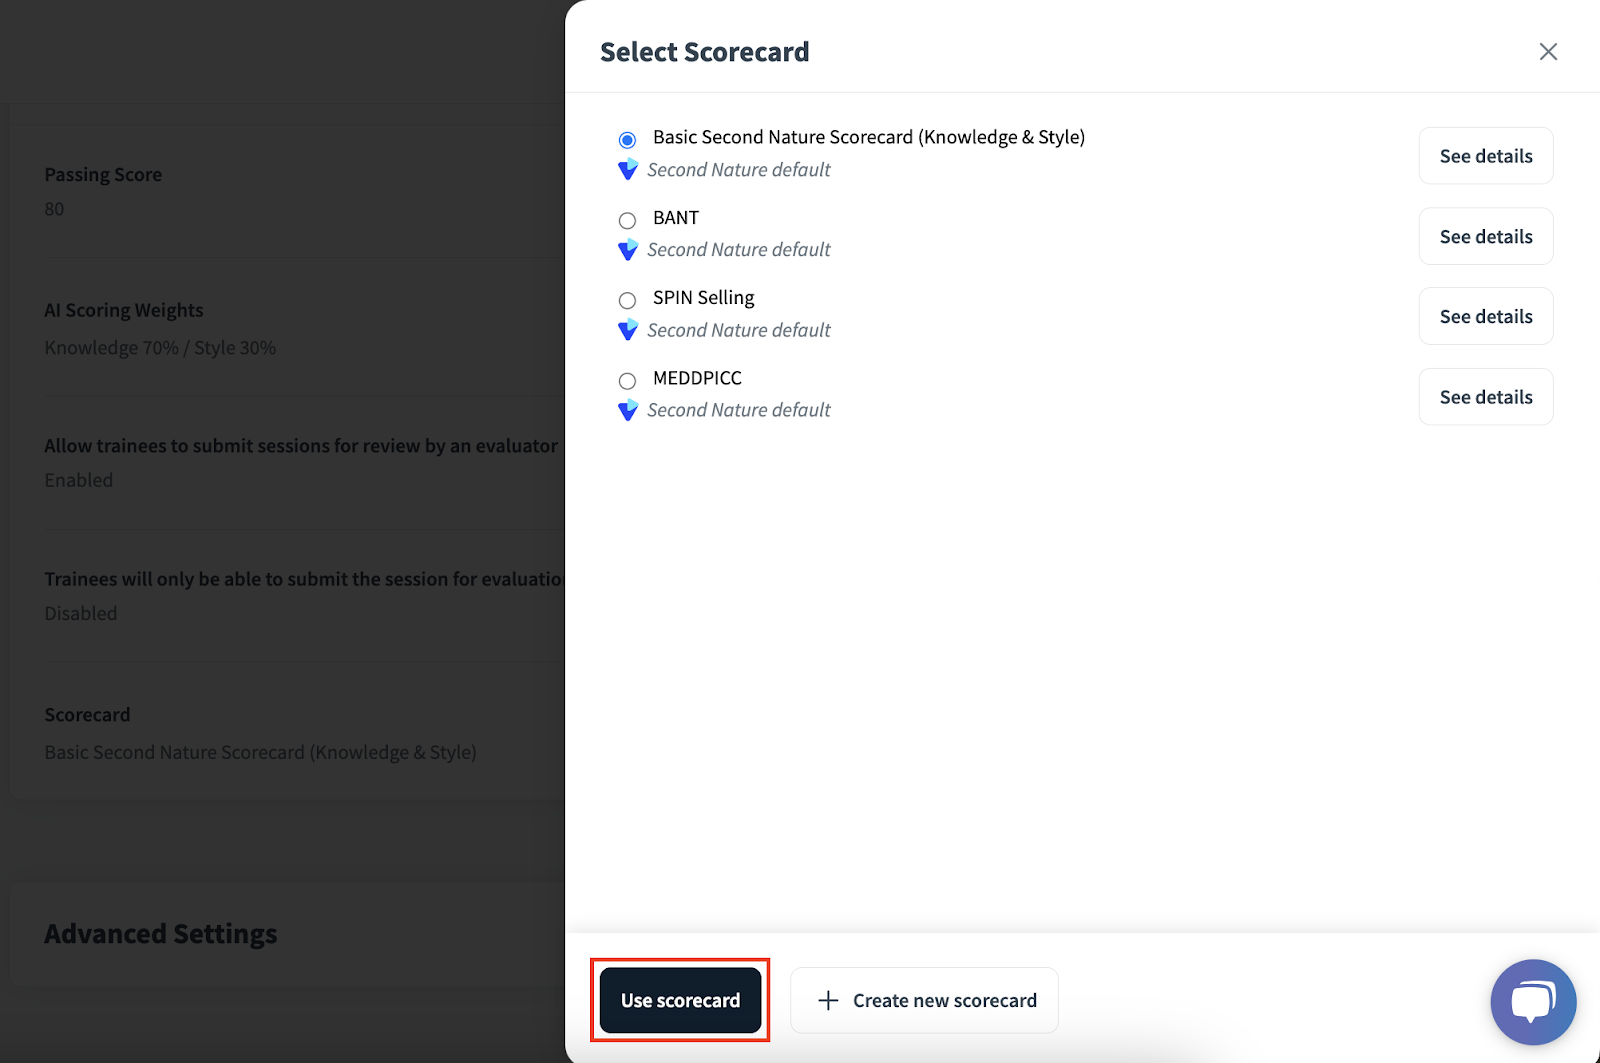
If you enable Allow trainees to submit sessions for review by an evaluator you will see an additional two options: Trainees will only be able to submit the session for evaluation if they have achieved the passing score and Scorecard.
The setting to only have trainees submit scores if they pass their simulation is disabled by default. Enable this setting to reduce the amount of simulations sent to evaluators.
Press Edit on the scorecard setting to reveal the Select scorecard panel. From this panel you may adjust which of your existing scorecards will be used by evaluators to evaluate trainees. Press + Create new scorecard if you would like to create a new set of parameters for evaluators to use when grading trainees. These parameters act similarly to the “topics” described in step 6. They must also add up to 100%. Press Use scorecard after selecting the appropriate scorecard for your evaluators to use.
See “Submitting a simulation for evaluation” for more details.
Creating a new scorecard
Course creators can create their own customized scorecard by clicking on the “Create new scorecard” button on the bottom part of the scorecard menu.
The scorecard creator needs to input :
The scorecard name
Scorecard guidelines URL [optional]
Scoring parameters
Name of the scoring parameters
Number of scoring parameters
Weight of each parameter

Once the scorecard creation is complete. Click on the Save Scorecard button on the bottom part of the drawer.
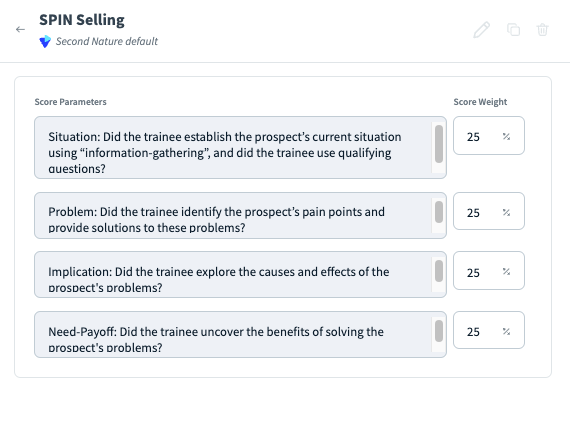
Scorecard Details
Course creators can see the scorecard details when clicking the see details button.
In this section they can change the score parameters or the parameters weights.
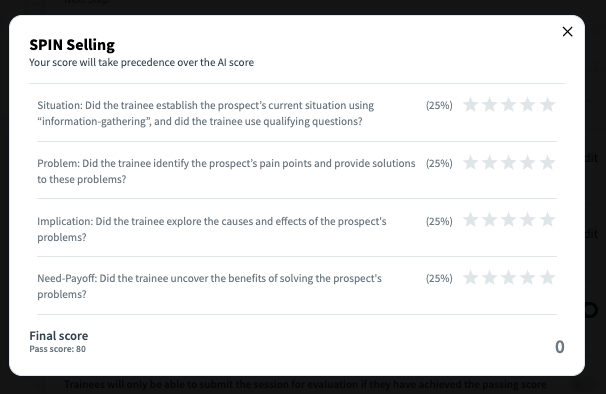
They can also get a preview of the scorecard that evaluators will see once the simulation is completed. The evaluation is graded in a 1-5 stars system.
If this is the scorecard that the course creator wants to use for this simulation, they just click on the Use this scorecard button on the bottom part of the drawer.
Preview of the scorecard the evaluators see when they need to provide:
Part 5: Advanced Settings Section
This section is only available if the “Create a simulation from recorded call” toggle is enabled.
a. Simulation Time Limit (optional): By default the simulation time limit is 20 minutes. You may adjust the maximum time for a simulation to be from 1-30 minutes.
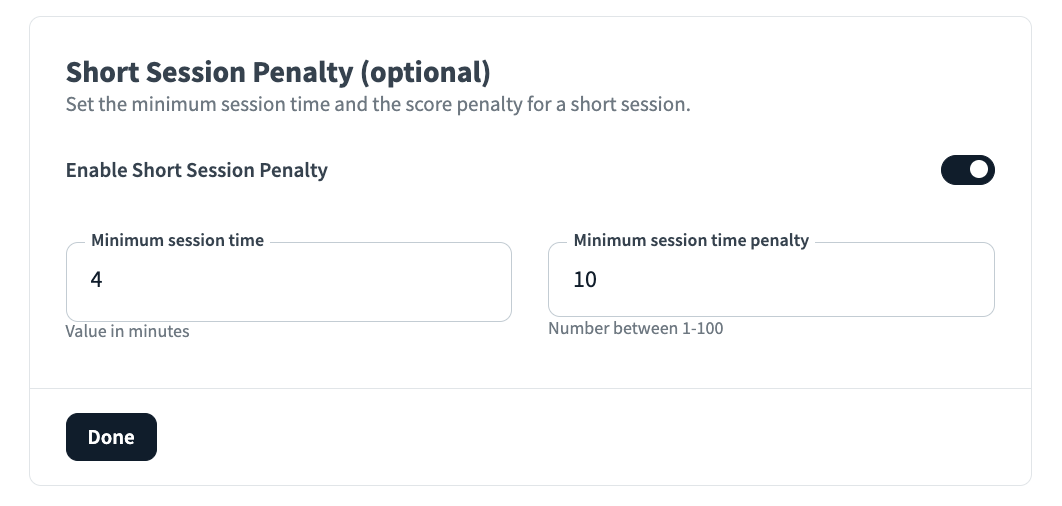
b. Short Session Penalty (optional): You may opt to have a minimum time which the trainee must engage in the simulation. Press Edit to toggle this setting. If you opt for a short session penalty, enter the minimum number of minutes and penalty. Press Done when complete.
i. For example, the default of 1 and 10 would indicate that the trainee must be on the call for at least 1 minute, or else they automatically lose 10 of 100 possible points.
c. Add the "Meet Your AI Trainer" Task Before Simulation: This optional feature will present an opening from the AI trainer before the simulation begins. By default this setting is disabled.
d. Enable Screen Sharing: Toggle this option if you would like to enable letting the trainee share their screen during the simulation. By default, this is disabled. Screen sharing will be visible in the bottom menu during the interactive conversation.

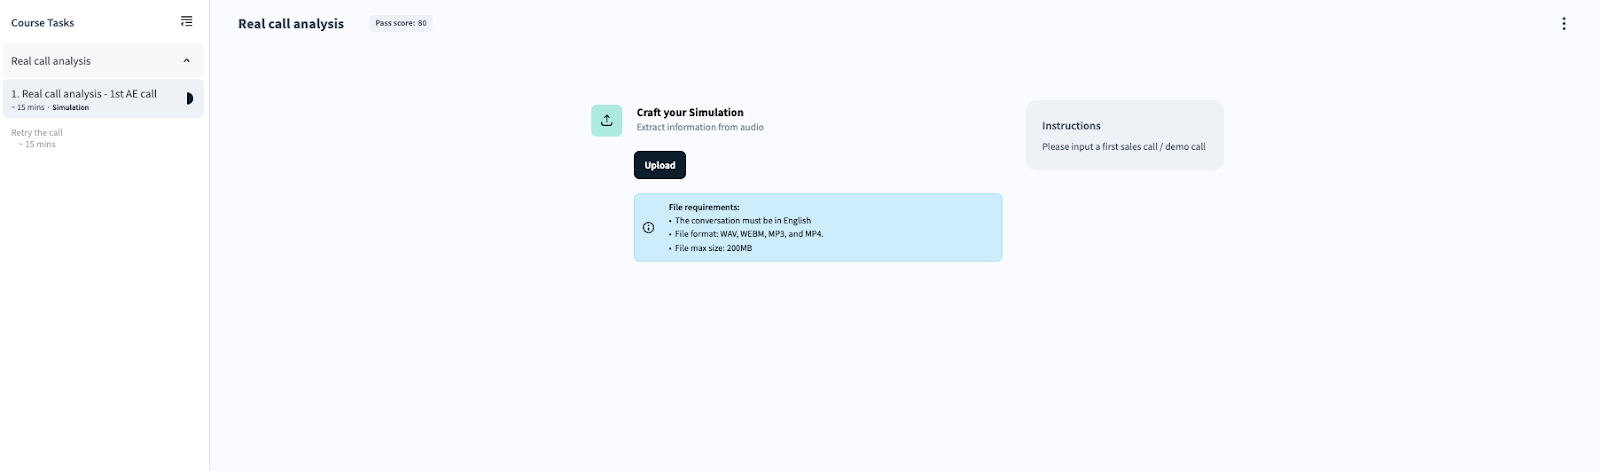
RCA: Trainee View
This is what the trainees see when practicing a real call analysis
Instructions [orange rectangle]
An upload button [blue rectangle]
A training simulation to practice after they get their call analysis [red rectangle]